
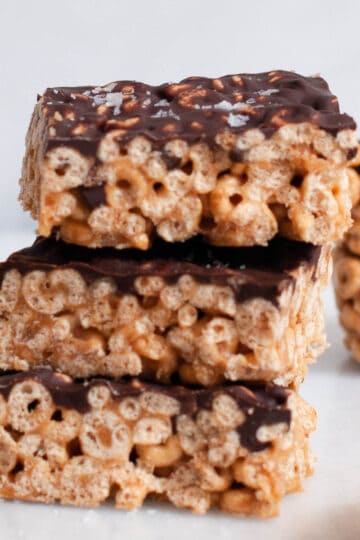
These no-bake peanut butter cereal bars are SO good! Chewy, a little salty, drizzled with chocolate, and truly so easy to make. Crispy O’s cereal gets coated in warm peanut butter, honey, and coconut oil, pressed into a pan, and set in the freezer. Just 7 ingredients, 10 minutes of prep, and you’ve got 12 grab-and-go bars for busy mornings or an afternoon snack!

Jump to:
My favorite grab-and-go breakfast bar
Mornings around here move FAST. Between getting Rhys ready and getting out the door, I need something I can grab with one hand, and these bars are it. I like to make a batch and keep them in the freezer so there’s always something ready when a craving hits.
Think of these like a homemade granola bar that’s made with cereal instead of oats. They’re totally kid friendly, but adults will love them just as much!
I used One Degree Organics sprouted honey O’s when I first made these, but you don’t need anything fancy. Cheerios, puffed rice, or any light, puffy cereal works great.
Why You’ll Love This Recipe
- No baking at all, just a saucepan and a pan to press them in
- Only 7 ingredients you probably already have
- Chewy and chocolatey with a little salty peanut butter flavor
- Freezer friendly so you can grab one anytime
- Kid approved and grown-up approved too

Erin's Expert Tips
From my kitchen to yours
- Press the Mixture Into the Pan Tightly. After pouring the coated cereal into your 8×8 pan, press it down very firmly. This is what holds the bars together when you cut and eat them, so don't rush through this step.
- Use Natural Peanut Butter. For the cleanest ingredient list and the best result, go with all-natural peanut butter here. Processed versions are full of additives that aren't needed, and natural PB gives these bars that perfect, rich flavor without any of the junk.
- Follow the Chocolate Chip Measurement. Measuring the chocolate chips rather than eyeballing is worth it here as too much chocolate can throw off the balance and make these feel more like a dessert than a satisfying snack bar.
- Don’t overheat the mixture. Warm it just until everything is melted and smooth, about 2 minutes, then stir in the vanilla off the heat.
- Let them sit before slicing. Give the bars 5 minutes at room temperature after the freezer so you get clean cuts.
Ingredients for peanut butter cereal bars
Here’s what goes into these no-bake cereal bars. Full amounts are in the recipe card below!

- Cereal: Any light, puffy cereal like honey O’s, Cheerios, or puffed rice.
- Natural peanut butter: Creamy and drippy works best. Almond butter is a good swap.
- Honey: Sweetens the bars and helps hold everything together.
- Coconut oil: Melted, so the bars set up firm in the freezer.
- Salt: Only if your peanut butter is unsalted.
- Vanilla: A little goes a long way here!
- Chocolate chips: Melted with a teaspoon of coconut oil for the drizzle on top.
How to make no-bake cereal bars
Pour the cereal into a large bowl. In a saucepan, warm the peanut butter, honey, coconut oil, and salt over medium heat for about 2 minutes, until smooth. Turn off the heat and stir in the vanilla.
Pour the peanut butter mixture over the cereal and stir until every piece is coated. Press it into an 8x8 pan as tightly as you can.
Drizzle the melted chocolate over the top and freeze for at least 1 hour. Let the bars sit out for 5 minutes, then slice and enjoy!

Frequently Asked Questions
Here are the cereal bar questions I get the most!
They usually weren’t pressed tightly enough. Pack the mixture down hard with a wet hand, and make sure they freeze for the full hour before cutting.
Yes! Almond butter or cashew butter work the same way. For a nut free version, try sunflower seed butter.
They hold their shape best in the freezer since the coconut oil softens at room temperature. Grab one and it’s ready to eat in about 5 minutes.
Light, puffy cereals like honey O’s, Cheerios, or puffed rice. Heavier flakes or clusters don’t coat as evenly.


Storing cereal bars
Store the bars in an airtight container or freezer bag in the freezer for up to 3 months. Let them sit at room temperature for about 5 minutes before eating.
If you tried this recipe or any other recipes on my blog, please leave a 🌟 star rating and let me know how it went in the 📝 comments below. Follow @erinliveswhole on Instagram and tag me in any of the recipes you make so I can repost them!

Ingredients
- 4 cups cereal I used One Degree Organics sprouted honey o's but you could used puffed rice, cheerios, or any somewhat puffed cereal!
- ½ cup natural peanut butter
- ½ cup honey
- ¼ cup coconut oil melted
- ¼ teaspoon salt if peanut butter isn't salted
- 1 teaspoon vanilla
- ½ cup chocolate chips melted with 1 teaspoon coconut oil.
Instructions
- In a large bowl, pour in cereal.
- In a saucepan, add peanut butter, honey, coconut oil and salt. Heat over medium until warmed through, about two minutes.
- Turn off heat and add vanilla.
- Pour over top of cereal and mix until very well coated.
- Press into 8x8 pan, VERY tightly. Wet your hand and press down until compacted completely.
- Drizzle melted chocolate overtop and place in freezer for at least 1 hour before eating.
- Store in freezer. Let sit at room temp for 5 minutes before cutting.
- Press the Mixture Into the Pan Tightly: After pouring the coated cereal into your 8×8 pan, press it down very firmly. This is what holds the bars together when you cut and eat them, so don't rush through this step.
- Use Natural Peanut Butter: For the cleanest ingredient list and the best result, go with all-natural peanut butter here. Processed versions are full of additives that aren't needed, and natural PB gives these bars that perfect, rich flavor without any of the junk.
- Follow the Chocolate Chip Measurement: Measuring the chocolate chips rather than eyeballing is worth it here as too much chocolate can throw off the balance and make these feel more like a dessert than a satisfying snack bar.
Nutrition
Per serving. Nutrition is an estimate.
Leave a star rating below and tag me on Instagram so I can see your creation!
Rate This Recipeif you liked this recipe, try these!
Find more easy breakfasts and snacks for busy mornings:
Recipe by Erin Morrissey and Photos by The Mindful Hapa


Leave a Reply