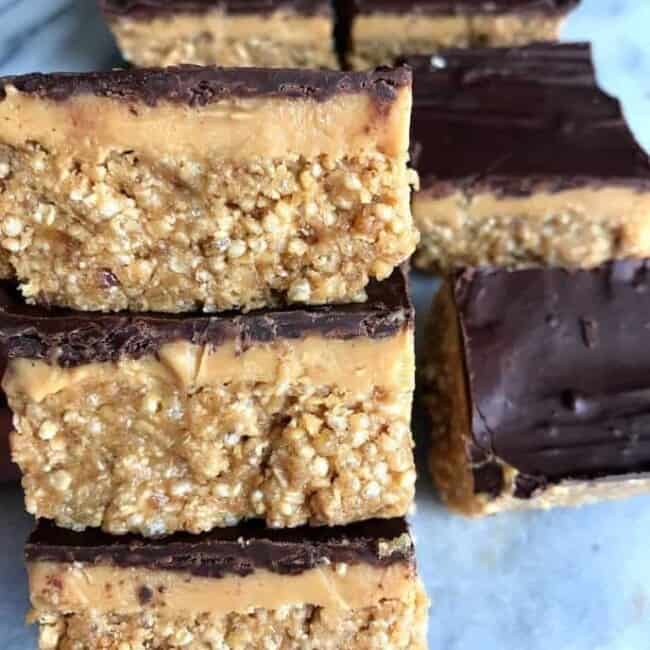
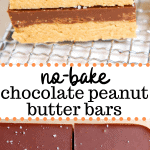
Peanut butter lovers, these Healthy Peanut Butter Bars were made for you! I make a batch almost every week because they come together with just FOUR ingredients, zero oven time, and taste dangerously close to a Reese’s cup (except you actually feel good about eating them)!

A Quick Look: No Bake Peanut Butter Bars
- ✅ Recipe Name: Healthy No Bake Chocolate Peanut Butter Bars
- 🕒 Ready In: 10 minutes prep + 1 hour freeze
- 👪 Serves: 12 bars
- 🍽 Calories: 316 per bar
- 📋 Protein: 8g per bar
- 🥬 Main Ingredients: Peanut butter, oat flour, maple syrup, chocolate chips
- 📖 Dietary Info: Vegan, gluten-free, dairy-free
- 🥣 Best For: Dessert, snacks, meal prep, lunchboxes
- ⭐ Why You’ll Love It: Four ingredients, no baking, and they taste like a homemade Reese’s!
Healthy No Bake Peanut Butter Bars Recipe
If you know me, you know I will always say yes to peanut butter and chocolate. It’s one of my favorite combinations, and these no bake bars keep it simple!
The base is made with peanut butter, oat flour, and maple syrup, so it comes together quickly and firms up nicely once chilled. Then you add a smooth chocolate layer on top, which gives each bite that sweet-salty balance that makes these so good.
I also love that these no bake peanut butter chocolate bars are easy to keep in the fridge or freezer. They’re great for meal prep, easy to portion out, and nice to have on hand when you want a homemade treat that is ready to go!
If you love easy no-bake treats like these, you’ll also want to try my Peanut Butter Energy Bars and No Bake Peanut Butter Oatmeal Cookies for more of that PB-chocolate goodness!
Table of contents
Why You’ll Love These Healthy No Bake Peanut Butter Bars
- Just four ingredients. Peanut butter, oat flour, maple syrup, and chocolate chips, that’s genuinely all you need! It doesn’t get much better than that.
- No oven required. These are fully no bake, which means you can make them any time of year without heating up your kitchen.
- They taste like a Reese’s cup. That salty peanut butter base + chocolate topping combo is absolutely unreal.
- Perfect for meal prep. Make a batch on Sunday and snack on them all week straight from the fridge or freezer.
- Easy to customize. Add flaky sea salt on top, swap in almond butter, or drizzle with white chocolate, these bars are a total blank canvas!

Ingredients Needed
Making a batch of these no-bake chocolate peanut butter bars are simple and requires only four ingredients.
- Peanut butter: You’ll need creamy peanut butter for the base and more for the topping if you’re mixing it with the melted chocolate. I like salted peanut butter for the sweet-salty flavor, but creamy unsalted works too!
- Oat flour: Oat flour gives the bars structure and a soft, sturdy texture. Store-bought is usually a little finer, but homemade works too if you blend rolled oats until very smooth. Using oat flour make these peanut butter bars completely gluten-free!
- Maple syrup: This sweetens the bars and help bring the base together. Honey or agave can work too.
- Chocolate chips: For the topping! Mini chocolate chips melt easily, but regular chocolate chips work just as well! You can use semi-sweet or dark chocolate chips.
Tip: For a yummy twist, you can add 1/2 cup of shredded coconut or chopped nuts as a topping. It can add an additional crunch and texture.
How to Make Easy Healthy Peanut Butter Bars
Step 1: Make the peanut butter base. In a medium bowl, mix together peanut butter, maple syrup, and oat flour until a thick dough forms. Press the mixture firmly and evenly into a parchment-lined 8×8 baking dish.
Step 2: Make the chocolate topping. Add chocolate chips and peanut butter to a microwave-safe bowl. Microwave in 30-second increments, stirring between each, until completely smooth.
Step 3: Assemble and freeze. Pour the melted chocolate mixture over the peanut butter base and spread evenly. Transfer to the freezer for 1 hour, or until fully set and firm enough to slice cleanly.
Step 4: Slice and serve. Lift the bars out using the parchment paper, cut into 12 bars, and enjoy! Store in the fridge or freezer

Erin’s Expert Recipe Tips
- Use salted peanut butter. It’s the secret to that addictive sweet & salty balance. If you only have unsalted, add a pinch of salt to the base.
- Line your dish with parchment paper. It makes cleanup easy and helps you pull out perfectly clean bars for slicing!
- Don’t rush the freeze. A full hour in the freezer is key so the chocolate sets properly and the bars hold their shape when sliced.
- Use a warm knife for cleaner slices. Run your knife under hot water, dry it, and then slice. The chocolate won’t crack or shatter.
- Storing: Keep bars in an airtight container in the fridge for up to 1 week, or freeze for up to 3 months. To freeze without sticking, lay bars in a single layer first, then transfer to a freezer-safe bag or container.
Frequently Asked Questions
Below are some common no bake peanut butter bar recipe questions. Don’t see the answer you’re looking for? Leave a comment at the bottom of this post!
Usually, that means the mixture is a little too dry, or the peanut butter was too thick. Make sure everything is fully mixed, and the base is soft enough to press firmly into the pan. Using a creamier peanut butter helps a lot.
For these no-bake peanut butter bars, I recommend using a creamy, salted peanut butter. It can be natural, but it might make the base mixture more dry. If you find the base mixture is too dry, you’ll want to add just a dash of water to make it smoother.
Yes. Double the ingredients and use a 9×13 pan if you want a bigger batch for sharing or meal prep.
If you liked this recipe, you’ll want to try these!
Here are some of my favorite peanut butter recipes you should make next. Enjoy!
- Chocolate Baked Oats With Peanut Butter
- Salted Peanut Butter Banana Bread
- Gluten-Free Peanut Butter Cookie Cups
- Flourless Peanut Butter Blondies
- Peanut Butter Cornflake Bars
Video Tutorial
If you tried this recipe or any other recipes on my blog, please leave a 🌟 star rating and let me know how it went in the 📝 comments below. Follow @erinliveswhole on Instagram and tag me in any of the recipes you make so I can repost them!

Healthy Peanut Butter Bars Recipe
Ingredients
Method
- In a medium bowl, mix together peanut butter, maple syrup, and oat flour until well combined.
- Press mixture into an 8×8 dish.
- Pour chocolate chips and remaining peanut butter into a microwave safe dish and microwave on 30 second increments until chips are melted.
- Pour melted chocolate peanut butter mixture over peanut butter base.
- Place in freezer for one hour, then cut and serve.
- Store in fridge or freezer!
Nutrition
Video
Notes
- Use salted peanut butter for the best flavor. The sweet-salty balance is what makes these bars so good! If you only have unsalted, just add a pinch of salt to the base mixture.
- Line your dish with parchment paper. It makes cleanup a breeze AND helps you get cleaner slices later. Totally worth the extra 30 seconds!
- Don’t skip the freezer step. The bars need to go in the freezer for a full hour before slicing. This ensures the chocolate layer sets properly so everything cuts cleanly and holds together.
ShaToya says
These have become a staple and family fave here in my household. The most perfect sweet treat!
Erin says
Hi ShaToya! Ah I am so happy to hear the bars are such a hit in your house!
Rachel says
Anything I’ve made from Erin has been 10/10, but this recipe has been the best yet! I subbed oat flour for almond and it turned out spectacular. A new family favourite!
Erin says
Hi Rachel! Thank you for your kind words and support! So happy you and your family enjoyed them!
Heather Corcoran says
Can you sub the almond flour for chickpea or buckwheat flour?
Erin says
Hi Heather, yes you can use whatever flour you’d like. Before you bake be sure to check the ratio for the flour you’re using since it is not always 1:1. Let me know what flour you use and how it comes out! 🙂
Tracy says
Just made these and they are delicious! So easy to make, thank you so much for the recipe! I will definitely be making these again!
Erin says
Hi Tracy! I am so happy you enjoyed the bars!!
Alexis says
Made these yesterday and they’re almost gone! I love how simple, easy, and delicious all your recipes are!
Erin says
Hi Alexis, thank you so much for your kind words! SO glad you like them!!
Kim says
This was delicious.
Erin says
Hi Kim! Thank you so much!! 🙂
Sharanne says
I LOVE these easy healthier Reese’s! I have made FOUR batches as my quarantine snack! Definitely recommend whipping these treats up!
Erin says
Hi Sharanne, thanks for your kind words! I am so happy you’re enjoying the bars!! 🙂
Isabella says
I loved this recipe! It was so easy it barely took me any time at all and you are so right they really do taste like a healthier Reeses. Highly recommend!!
Erin says
Hi Isabella! I am so happy you enjoyed them!! 🙂
Taylor says
Yum!!! Making asap (:
Erin says
Hi Taylor, let me know how they come out!
Anna says
You said to use 1 cup salted peanut butter and half a cup of regular peanut butter. Which one is used to make the peanut butter base and the chocolate base?
Erin says
More for the base! I’ll clarify!
Erin says
Hi Anna, the 1 cup salted peanut butter is for the base and the 1/2 cup peanut butter is for the topping. Let me know how yours come out!
Marita says
So easy and delicious – absolutely exceeded expectation! Erin always manages to make yummy recipes so accessible – not even a mixer required for this one!!1
Erin says
Hi Marita, thank you so much for your kind words! I am so happy you enjoyed them! Thanks for your support!
Gina says
Just made these and they are amazing !!! Another great recipe Erin !
Erin says
Hi Gina, I am thrilled you like them!
Ashley says
I made this for my bday party and they were amazing! Everyone loved them! I used honey instead of maple syrup and I didn’t not mix pb with the chocolate. I just melted the chocolate with a little coconut oil and it was perfect!
Erin says
Hi Ashley, happy belated birthday!! I am so happy everyone liked them and you made them your own! 🙂
Lindsay says
I have been eyeing these for awhile now and finally got around to making them. So good! I cut them into smaller squares and they are the perfect amount for satisfying my nightly sweet tooth.
Erin says
So glad you liked them!
Barbara Cohen says
Just made these and they are so yummy…I changed a couple things…used all purpose flour I just saw your comment above recommending not to use it….sigh…) I didn’t use peanut butter with the chocolate for the topping and they turned out delicious! Thanks so much for the recipe!
Erin says
Hi Barbara, I am so happy you enjoyed the bars and made them your own!! 🙂
Kelsea says
This recipe is 11/10. Definitely going to be making again!!!
Erin says
Thank you girl!!! Love that you love them.
Danielle says
These are so easy to make and perfect for when I’m feeling a sweet tooth come on.
Erin says
SO glad you liked them Danielle!
Erin says
Hi Danielle! I am thrilled you love the bars!
Teresa Witten says
WOW!!! These are so good and so few ingredients, and easy to make.
Erin says
YAY! SO happy you enjoyed them!
Erin says
Hi Teresa, thank you so much for your kind words! I am thrilled you enjoyed them!
Sarah says
I made these earlier and they were so tasty!!! I had to put them back in the freezer after I cut them to harden them a bit more but will definitely make them again, and I used almond flour for mine?
Erin says
Ah good to know! Thanks for sharing this.
Erin says
Hi Sarah, thanks for your kind words! I am so glad you liked them! I would say not to add more flour because it might make them too dry. I think popping them back in the freezer is better to harden them so the taste stays the same. Hope this helps!
Sylvia G says
Made these last night and we loved them! Super easy to make and cures that Reese’s craving.
Erin says
Hi Sylvia, thanks for your kind words! I am so happy you enjoyed them!