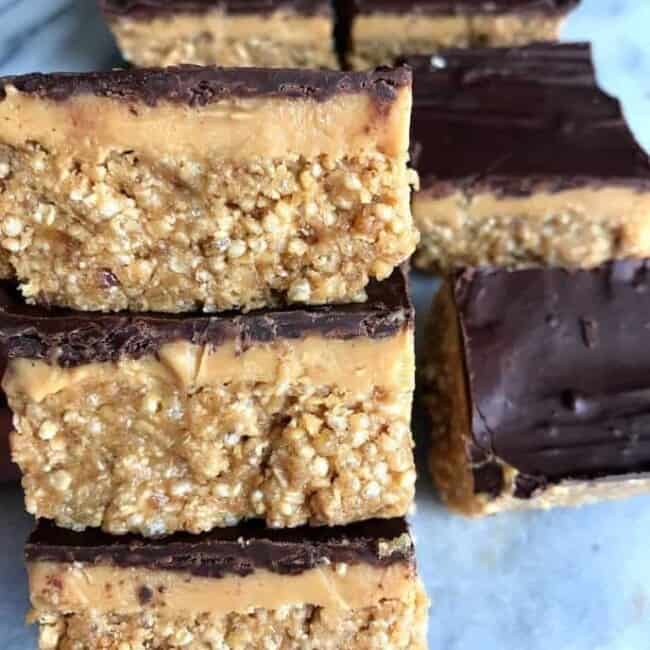
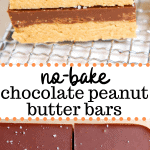
Peanut butter lovers, these Healthy Peanut Butter Bars were made for you! I make a batch almost every week because they come together with just FOUR ingredients, zero oven time, and taste dangerously close to a Reese’s cup (except you actually feel good about eating them)!

A Quick Look: No Bake Peanut Butter Bars
- ✅ Recipe Name: Healthy No Bake Chocolate Peanut Butter Bars
- 🕒 Ready In: 10 minutes prep + 1 hour freeze
- 👪 Serves: 12 bars
- 🍽 Calories: 316 per bar
- 📋 Protein: 8g per bar
- 🥬 Main Ingredients: Peanut butter, oat flour, maple syrup, chocolate chips
- 📖 Dietary Info: Vegan, gluten-free, dairy-free
- 🥣 Best For: Dessert, snacks, meal prep, lunchboxes
- ⭐ Why You’ll Love It: Four ingredients, no baking, and they taste like a homemade Reese’s!
Healthy No Bake Peanut Butter Bars Recipe
If you know me, you know I will always say yes to peanut butter and chocolate. It’s one of my favorite combinations, and these no bake bars keep it simple!
The base is made with peanut butter, oat flour, and maple syrup, so it comes together quickly and firms up nicely once chilled. Then you add a smooth chocolate layer on top, which gives each bite that sweet-salty balance that makes these so good.
I also love that these no bake peanut butter chocolate bars are easy to keep in the fridge or freezer. They’re great for meal prep, easy to portion out, and nice to have on hand when you want a homemade treat that is ready to go!
If you love easy no-bake treats like these, you’ll also want to try my Peanut Butter Energy Bars and No Bake Peanut Butter Oatmeal Cookies for more of that PB-chocolate goodness!
Table of contents
Why You’ll Love These Healthy No Bake Peanut Butter Bars
- Just four ingredients. Peanut butter, oat flour, maple syrup, and chocolate chips, that’s genuinely all you need! It doesn’t get much better than that.
- No oven required. These are fully no bake, which means you can make them any time of year without heating up your kitchen.
- They taste like a Reese’s cup. That salty peanut butter base + chocolate topping combo is absolutely unreal.
- Perfect for meal prep. Make a batch on Sunday and snack on them all week straight from the fridge or freezer.
- Easy to customize. Add flaky sea salt on top, swap in almond butter, or drizzle with white chocolate, these bars are a total blank canvas!

Ingredients Needed
Making a batch of these no-bake chocolate peanut butter bars are simple and requires only four ingredients.
- Peanut butter: You’ll need creamy peanut butter for the base and more for the topping if you’re mixing it with the melted chocolate. I like salted peanut butter for the sweet-salty flavor, but creamy unsalted works too!
- Oat flour: Oat flour gives the bars structure and a soft, sturdy texture. Store-bought is usually a little finer, but homemade works too if you blend rolled oats until very smooth. Using oat flour make these peanut butter bars completely gluten-free!
- Maple syrup: This sweetens the bars and help bring the base together. Honey or agave can work too.
- Chocolate chips: For the topping! Mini chocolate chips melt easily, but regular chocolate chips work just as well! You can use semi-sweet or dark chocolate chips.
Tip: For a yummy twist, you can add 1/2 cup of shredded coconut or chopped nuts as a topping. It can add an additional crunch and texture.
How to Make Easy Healthy Peanut Butter Bars
Step 1: Make the peanut butter base. In a medium bowl, mix together peanut butter, maple syrup, and oat flour until a thick dough forms. Press the mixture firmly and evenly into a parchment-lined 8×8 baking dish.
Step 2: Make the chocolate topping. Add chocolate chips and peanut butter to a microwave-safe bowl. Microwave in 30-second increments, stirring between each, until completely smooth.
Step 3: Assemble and freeze. Pour the melted chocolate mixture over the peanut butter base and spread evenly. Transfer to the freezer for 1 hour, or until fully set and firm enough to slice cleanly.
Step 4: Slice and serve. Lift the bars out using the parchment paper, cut into 12 bars, and enjoy! Store in the fridge or freezer

Erin’s Expert Recipe Tips
- Use salted peanut butter. It’s the secret to that addictive sweet & salty balance. If you only have unsalted, add a pinch of salt to the base.
- Line your dish with parchment paper. It makes cleanup easy and helps you pull out perfectly clean bars for slicing!
- Don’t rush the freeze. A full hour in the freezer is key so the chocolate sets properly and the bars hold their shape when sliced.
- Use a warm knife for cleaner slices. Run your knife under hot water, dry it, and then slice. The chocolate won’t crack or shatter.
- Storing: Keep bars in an airtight container in the fridge for up to 1 week, or freeze for up to 3 months. To freeze without sticking, lay bars in a single layer first, then transfer to a freezer-safe bag or container.
Frequently Asked Questions
Below are some common no bake peanut butter bar recipe questions. Don’t see the answer you’re looking for? Leave a comment at the bottom of this post!
Usually, that means the mixture is a little too dry, or the peanut butter was too thick. Make sure everything is fully mixed, and the base is soft enough to press firmly into the pan. Using a creamier peanut butter helps a lot.
For these no-bake peanut butter bars, I recommend using a creamy, salted peanut butter. It can be natural, but it might make the base mixture more dry. If you find the base mixture is too dry, you’ll want to add just a dash of water to make it smoother.
Yes. Double the ingredients and use a 9×13 pan if you want a bigger batch for sharing or meal prep.
If you liked this recipe, you’ll want to try these!
Here are some of my favorite peanut butter recipes you should make next. Enjoy!
- Chocolate Baked Oats With Peanut Butter
- Salted Peanut Butter Banana Bread
- Gluten-Free Peanut Butter Cookie Cups
- Flourless Peanut Butter Blondies
- Peanut Butter Cornflake Bars
Video Tutorial
If you tried this recipe or any other recipes on my blog, please leave a 🌟 star rating and let me know how it went in the 📝 comments below. Follow @erinliveswhole on Instagram and tag me in any of the recipes you make so I can repost them!

Healthy Peanut Butter Bars Recipe
Ingredients
Method
- In a medium bowl, mix together peanut butter, maple syrup, and oat flour until well combined.
- Press mixture into an 8×8 dish.
- Pour chocolate chips and remaining peanut butter into a microwave safe dish and microwave on 30 second increments until chips are melted.
- Pour melted chocolate peanut butter mixture over peanut butter base.
- Place in freezer for one hour, then cut and serve.
- Store in fridge or freezer!
Nutrition
Video
Notes
- Use salted peanut butter for the best flavor. The sweet-salty balance is what makes these bars so good! If you only have unsalted, just add a pinch of salt to the base mixture.
- Line your dish with parchment paper. It makes cleanup a breeze AND helps you get cleaner slices later. Totally worth the extra 30 seconds!
- Don’t skip the freezer step. The bars need to go in the freezer for a full hour before slicing. This ensures the chocolate layer sets properly so everything cuts cleanly and holds together.
Wanda Dwyer says
Can this stay in freezer for a week. The event I was making it for was cancelled.
Erin says
Hi Wanda, yes, for sure!
lael says
can you use almond butter in this recipe?
Erin says
Hi, yes, for sure. Let me know how yours come out!
Bunny says
I replaced the peanut butter with almond butter and a pinch of salt. While I imagine it is a bit more cloying than peanut butter it tastes good and the consistency worked.
Erin says
Hi Bunny, so glad you liked them and made them your own!!
Terri Valentine says
This is a household favorite for all. I make several times a month and add vanilla to the pb base. So delicious!!
Erin says
Hi Terri, so happy you love them and make them your own! 🙂
Lacey says
I make these ALL the time! Better than the “real” Reese’s!! Make them, you won’t regret it!
Brooklyn says
This has become our go to dessert recipe! We make it all the time. So yummy and simple!
Erin says
Hi Brooklyn, so happy you loved them!
Alis VanZant says
Could Chickpea Flour be substituted for Oat Flour? Thanks for the great recipe!
Erin says
Hi Alis, I haven’t tried this sub, but feel free to could give it a try! Let me know how your bars come out!
lisa says
can you use all purpose flour? I don’t wanna buy oat flour or almond flour because I will never use them again would be a waste of money thank you so much.
Erin says
Hi Lisa, it unfortunately won’t work the same, as almond flour is not nearly as absorbent. So sorry!
Lara says
Make oat flour from oats!
Sharon J Smith says
I haven’t made these yet, nut wondering if I can use the powdered peanut butter to reduce fat?
Robin says
I use PB flour when I make mine and they turn out wonderful!
Erin says
Hi Robin, so happy you loved them!
Natt Webb says
Hi Erin. I made these and they are lovely! Please could you tell me the rough weight per bar for the 330cal
Many thanks
Natt
Patty Thomas says
These are so good Reese’s without the fat! No guilt!
Isabel says
Hi Patty, this recipe does have quite a bit of fat from the peanut butter and chocolate. So not a fat free recipe.
Erin says
Hi Patty, so glad you loved them! 🙂
Josh says
I used stevia sweetened chocolate chips.
Erin says
Hi Josh, great idea!!
DM says
I’m interested in making this recipe, but the biggest question in my mind is, which type of peanut butter is being used? Is it all natural peanut butter, consisting of only peanuts and salt, or a no-stir variety, which usually has peanuts, salt, sugar, and some other stabilizing fat, like a Hydrogenated vegetable oil.
Knowing which type to use makes all the difference in the final product.
Erin says
Hi, I used normal peanut butter. 🙂
Olivia says
Did you use all natural?
Erin says
Hi Olivia, yes! Let me know how your bars come out!
Michelle Rathmell says
Used dark chocolate. Omgoodness they are almost all gone thanks to me. So good great recipe.
Erin says
Hi Michelle, so happy you loved them! 🙂
Deidre says
Would measure for measure 1:1 substitute for wheat flour work as well?
Erin says
Hi Deidre, I haven’t tried that but not sure if it would work. I’d recommend doing 1 cup or oat flour OR almond flour for best results! 🙂
Karen says
Delicious! I used 82% dark chocolate I had on hand and added raw honey for extra sweetness. I then topped it all with flaked sea salt for that extra salty/sweet taste.
Erin says
Hi Karen, so happy you loved them and great idea!!
Tammi says
Absolutely delicious! Easy to make.
Erin says
Hi Tammi, so happy you loved them! 🙂
Sonya says
These came out so great! I reduced the amount of maple syrup and it had just the right amount of sweetness. My 7 year old son loved it too. Thank you!
Erin says
Hi Sonya, so glad they were a hit! 🙂